Your personal files, such as Documents, Pictures, and Videos, are saved in your user’s Windows folder, as is the AppData folder where program settings are saved.
Because of this, it is interesting to regularly back up the user’s folder. In this tutorial we will show you two different ways to back up your user folder on Windows 10, 8 and Windows 7.
Option 1 –
Windows Backup
Microsoft has introduced a backup tool in Windows 7 that you can use to back up your user’s Windows folder. This feature is also present in Windows 10 and Windows 8.1.
1. Search for backup from the Start Menu and click on the “Backup Settings” option or click on the “Settings” button on the Start menu and go to “Update and Security” and click on “Backup” in the sidebar.
Note: In Windows 7 and 8.1, select the “Backup and Restore” option when searching the Start Menu.
2. In the open window, click on the option “Go to Backup and Restore (Windows 7)”.
3. Click on “Set up backup”.
4. Select the location where you want to save the backup. Note that the backup cannot be saved to the same disk.
5. At the next screen, check the option “Let me choose”.
6. Check the box labeled “YourUserName Libraries”. You can click the “arrow” to view all included folders. In addition to the standard libraries, it saves the Downloads, AppData, and Desktop folder.
Note: Also uncheck “Include a system image of drives” and click “Next”.
7. Finally, click on “Save Settings and Run Backup”. It will also create a backup schedule. If you want to change or disable the scheduling option, click “Change Schedule.”
8. Okay, now you just wait for the backup to complete.
9. To restore files from backup, simply use the “Restore my files” option. If you are restoring files to another computer, use the “Select another backup from which to restore files.”
Option 2 – ShadowCopy
You can also use third party programs to back up the user folder. However, if you use any backup program, it will most likely not be able to copy the files in use.
ShadowCopy is a file copying program for Windows that uses Microsoft’s “volume shadow copy service” to allow copying of files in use by the system or by a program.
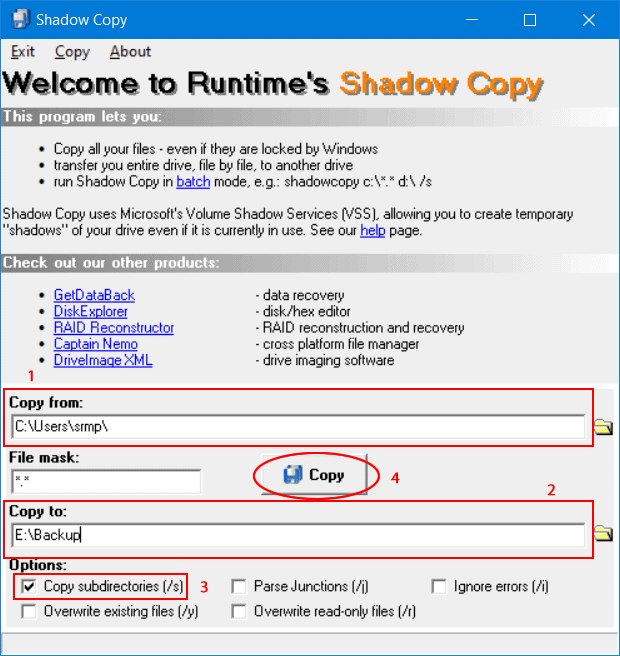
1. Download, install and run ShadowCopy on your computer.
2. In the “Copy from” field select your user’s folder, which is “C:\Users\YourUserName”.
3. Select the location where you want to save the backup in the “Copy to” field. Note
that you cannot select a folder on the same hard disk to save your backup. Also check the “Copy Subdirectories” option.
4. Lastly, click “Copy” to start the backup and wait for the job to complete.