In addition to allowing us to
preview an operating system, a Live disk can be used to create backup data, shrink partitions, clone the hard drive, scan the system for viruses and more. Although the image or cloning of the hard drive can be done using a simple backup of the data and applications it contains, some systems may be infected with malware that often makes it difficult to perform backups of essential data. For example, if a PC has been infected with a virus in the boot sector, disk cloning will not work unless you clean the system of viruses and repair the boot sector.
Ubuntu Live allows us to clone and create disk images, so we can easily restore data after performing a system format. In this post, we will see two simple ways to clone the disk or create an image of it thanks to the creation of an Ubuntu Live USB.
The first step is to change the system boot sequence from the BIOS menu. When the PC is turned on, press F2, F10, ESC, DELETE or any other button that on your system is used to access the BIOS menu. Now, in the boot order section, select USB Drive Disk/Removable Disk as the first option. Once done, save the changes, connec
t the Live USB, reboot and you should be able to enter Ubuntu Live.
Create an image of a local partition
Once your Ubuntu Live USB has booted, make sure that the drive you want to create an image of is properly mounted, otherwise mount it yourself. At this point, open the terminal and type:
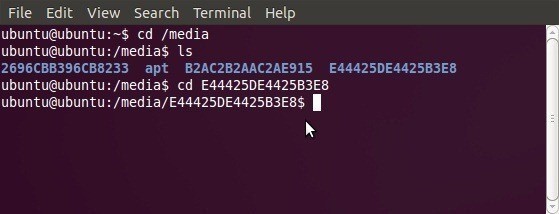
cd /media
and you will find all the units present. At this point, however, if we have to create an image of our disk, we cannot save it on the disk itself otherwise we would not have enough space to save it. So what you can do is choose to save the image to another partition or to an external disk! In this example I will pretend to save everything on an external hard drive. Please, before continuing, move from the terminal to the external unit by typing:
cd external_disk_label
Since we need to create a disk image for an external disk, we will use it
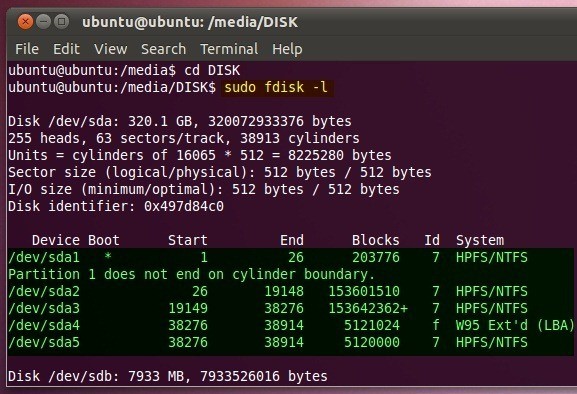
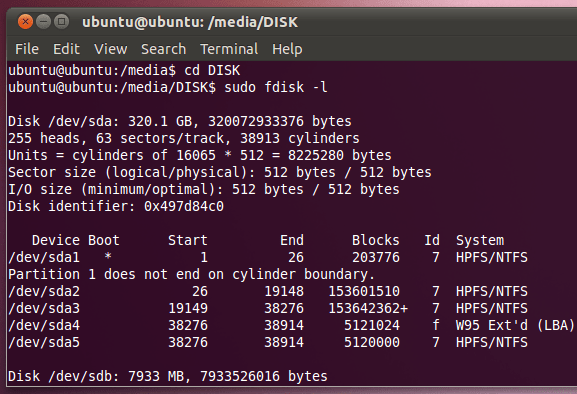
sudo fdisk-l
to list all partitions of the primary hard disk; this will help us identify the partition whose image is to be created. Once the list is returned, write down the partition identifier in the device column, as it will be used to specify the partition of the hard drive with the dd command to create the image.
The syntax for creating the image is:
sudo dd if = PARTITION_IDENTIFIER of =. /IMAGE_NAME
For example, if you want to create a disk image for /dev/sda5 date:
sudo dd if=/dev/sda5 of=./BackupDisk.img
The time required to create a disk image depends on the size of the specified disk partition. The dd command
also allows you to restore or extract the IMG file to the specified location. The syntax, in this case, is as follows:
sudo dd if = .image_name of = DIRECTORY_OF_OUTPUT
You can specify the local disk where the data is to be extracted or specify the hierarchy of folders where you want to copy the data from IMG files. Here is a possible syntax:
sudo dd if=./BackupDisk.img of=/dev/sda3
ATTENTION: when restoring the data from the IMG file with the dd command, all the free space of the destination disk will be deleted! In addition, the dd command will copy ALL but just ALL the disk you have chosen to clone, even any empty clusters. So be careful of the space you need!
Clone a Local Disk
The disk cloning process is similar to creating a disk image. All you have to do is mount the primary hard disk and navigate through the terminal by typing cd IDENTIFIATORE_DISCO_ESTERNO. Here is an example:
Once mounted, use the command
sudo fdisk-l
to list the hard disk partitions, so that you can write down the device identifiers of both disks, including the disk that is to be cloned and the destination disk where the data is to be copied.
For example, if you want to create a clone of / dev / sda5 in / dev / sda3 you have to type:
sudo dd if=/dev/sd5 of=/dev/sd3
That’s all 🙂