When a problem of any kind arises inside your computer there are many ways to find a solution. In general, the Operating System is developed precisely to prevent errors and ensure that data is always safe. However, it could happen that you run into some hardware/software problems that must be solved manually. This is possible thanks to a multitude of programs and tools. It could happen, for example, that you can no longer start the Operating System and get stuck in the BIOS for some hardware/software problem. In this case, you need to make a diagnosis, so let’s see how to do a hardware test from the PC BIOS.
How to do a hardware test from the PC BIOS
There are various ways to scan from the BIOS. You could rely directly on your computer, or download third-party software created specifically for hardware tests.
Perform a hardware test from the BIOS of your PC
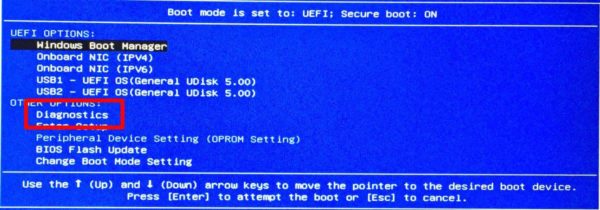
Generally, manufacturers insert a diagnostic system into the computer to scan directly from the BIOS. This system contains all the tools necessary to check for problems and eventually solve them. All you have to do is turn on your PC and enter the BIOS. If you don’t know how to do it, or want more information, I recommend you read our guide where we explain step by step how to access the BIOS on any computer. Once inside, all you have to do is look for the Diagnosis section and run the various hardware tests.
Perform a hardware test with third party software
If you don’t have the tools to do a hardware test, you will need to get them. Again, it will take a few minutes. All you have to do is get a USB stick and, of course, your computer.
One program that we recommend is MemTest86, free and easy to use. All you have to do is:
- Download MemTest86 from the official web page
- Download Etcher to burn the program onto a USB device
Once you have mastered the program you will have to set your USB stick as a boot device. To do this you will have to go into the BIOS and look for the entry First Boot Device or Boot Priority Order. Using the arrows on the keyboard, you will have to adjust the order of the devices, inserting the USB stick in the first place. Once this is done, all you have to do is save and exit the BIOS, then your computer will automatically restart.
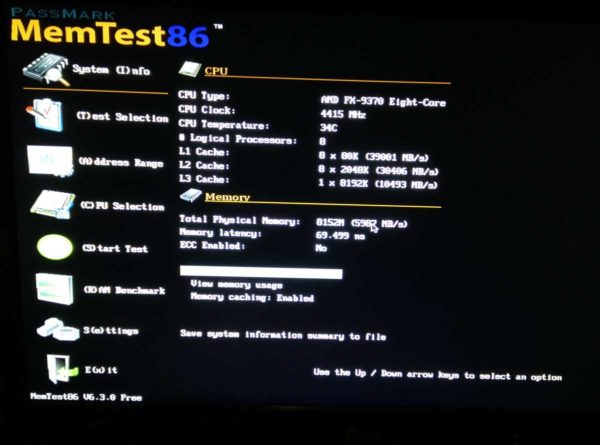
Now, if you have carried out the operations correctly, you will see Memtest86 start and you can start the hardware test to search for any errors. It is good to know that the test may take a long time, but you can stop the test whenever you want.
Use a Windows 10 or Ubuntu boot disk
Another very good solution is to create a boot disk using Windows 10 or Ubuntu. In fact, using the Windows 10 startup disk you can access some tools such as the command prompt, useful for a quick search for errors. Obviously it will not be as effective as a hardware test from the BIOS, but in some cases it may help solve the problem. If you are interested in creating a bootable Windows 10 disk for a simple scan, take a look at our detailed guide on how to boot Windows 10 from USB or DVD.
In addition, you can also opt for Ubuntu, the most famous and used Linux distribution. A peculiarity of Ubuntu is the possibility to try it before installing it permanently. This could be very useful if your purpose is to only perform a hardware scan. In fact, you can start any third party app, which cannot be done from the BIOS. As in the case of Windows 10, I leave you our guide where we explain how to create an Ubuntu Live USB.
These are valid solutions that will allow you to do a hardware test from the Bios of your computer.