We often wonder if iCloud for Windows really exists: the answer is yes, for that matter officially!
Apple has accustomed us to think that Apple software is designed specifically for Apple hardware; which is often true, but it cannot be overlooked that there are also different devices in the world and that even Apple users could use them.
This is the explanation why, like other different applications, there is also iCloud for Windows! The operation of this official program is very, very similar to its counterpart for macOS/OS X. If you were looking for a user guide then you have come to the right article!
Below we will show you how iCloud works for Windows, where to download it and how to configure it!
iCloud for Windows: download
iCloud for Windows can be downloaded from Apple’s official website by clicking on the link below.
DOWNLOAD | iCloud Windows (Apple)
Once downloaded it installs like any other Windows program. At the end of the installation we will ask to restart the computer.
iCloud for Windows: guide
First access
After restarting the computer, iCloud for Windows will start automatically with the operating system. If this is not the case we will be able to recall it from the Start menu.
NOTE: to use iCloud for Windows you need our Apple ID already used to configure iCloud on iPhone, iPad, iPod or macOS/OS X.
We will immediately be asked for credentials to access our Apple ID: insert them where required.
After a few seconds, we will be shown a window that allows us to decide which elements to synchronize with our Windows PC.
We will have to leave the check mark next to each of the elements we intend to configure in iCloud for Windows: iCloud Drive, Photos, Mail (with Contacts, Calendars and Tasks) and bookmarks. Once we have made our choice, click on Apply.
We can modify our choice at any time by opening iCloud for Windows from the Start menu or the Start Screen.
iCloud Drive
Activating iCloud Drive in iCloud for Windows involves creating a folder in Windows synchronized with Apple’s cloud space. It will download all the files in iCloud Drive.
The iCloud Drive directory will be created in the user folder and a quick bookmark will be immediately added to the Explorer for quick access.
If we want to save a file in iCloud Drive we can easily move it or copy it to that folder. File changes will always be synchronized (when an Internet connection is present) and also reported to all other devices where iCloud Drive is configured with our Apple ID.
iCloud Photo
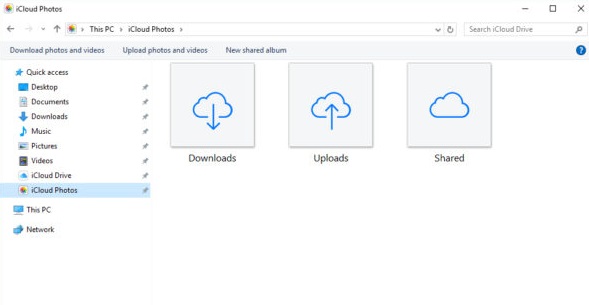
Obviously iCloud for Windows allows you to use even the very comfortable Photos! Also in this case, once the functionality is activated, a dedicated directory is created – iCloud Photos – in the System Images folder. At the same time, a bookmark is also created for quick access to it from Windows Explorer.
Exactly as expected, this part of iCloud for Windows allows us to upload new photos and videos: just drag them to the Uploads folder and, once synced, they will be available in the Photos app and in the iPhone, iPad, iPod Touch Gallery Mac and, of course, iCloud.com.

In the Downloads folder we can instead find the photos and videos downloaded automatically from the Photo Library. If desired, from the settings, we can choose to download the collections by year.
The Sharing folder is instead very special: in it we will be able to find the photos and videos shared with other people, share others and comment on them. We can also find the iCloud Photo Library in the Start menu.
Email, contacts, calendars and reminders
If we put the check mark on “Mail, Contacts, Calendars and Reminders” in the first configuration phase, we will be able to find them in the panel dedicated to Microsoft Outlook user folders (from 2007 to 2016).
Bookmarks
If we have activated the Bookmarks feature, those on Safari for iPhone, iPad, iPod and macOS / OS X will automatically be available in Internet Explorer 10 or later, Firefox 22 or later and Chrome 28 or later.
Deactivate a service
If suddenly we want to disable one or more iCloud services for Windows, we will only have to call up the program from the Start menu and remove the check mark from the service we intend to disable, then click on Apply.
In this way the synchronization of the chosen service will be interrupted: we will no longer be able to see the latest changes to the files made by the other devices or to synchronize the changes made by the Windows PC.
We can still reactivate the synchronization at any time.
Disable iCloud for Windows
If we want iCloud for Windows to no longer sync anything, we can do it at any time by opening the program from the Start menu and selecting Exit. Let’s make sure that iCloud for Windows is not present in the startup applications and, if it is not, let’s disable it.
How to disable programs when Windows starts
In this way, however, the files already synchronized will remain on the PC; to delete everything, including synchronized files, we will have to completely uninstall iCloud for Windows instead.