How many times have we come across this problem where we have to change the boot order of the PC? Certainly many, especially when we had to reformat PCs with Windows, Linux or any other operating system.
Furthermore, it may be necessary to change the boot order of the PC when we have to perform diagnostic operations; in particular, some of them require that the operating system is not started. So to complete the operation we must start the machine from an external support!
In fact, changing the boot order of the PC is simple; done the first time, you can always do it! The trouble, not even to say it, is … do it the first time, in fact!
In this guide we try to better explain how to change the PC boot order in a simple way; unfortunately there is no s
tandard procedure, this is different for each device; the tips you will find below will help you get straight to the point!
Change the boot order of your PC
Use the appropriate boot entry
It is often possible to change the boot order of the PC simply by pressing a button, without having to go into the BIOS or the UEFI interface. In this case, the change will only be valid once.
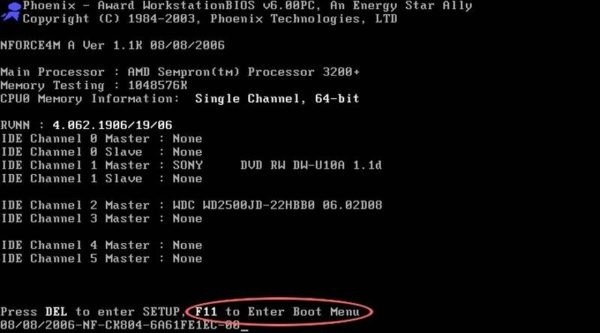
To do this, we pay attention to the very first screen that the PC shows us; most of the time this contains the logo of the motherboard or PC manufacturer.
We are very attentive to the small items that appear at the bottom (generally right or centered) or at the top right; among them, it might look something like
Press [KEY] to change boot order
or
Press [KEY] to enter boot menu
or again
Press [KEY]
  for UEFI Boot Menu or [KEY] = UEFI boot manager
Or other very similar options. In short, something like this:
or this

Once this is done, we will probably be shown a small window that includes all the connected media from which the PC can start (DVD, USB or possibly network boot). From here we can immediately choose the device from which to start the PC, moving with the directional arrows and giving Enter.
As mentioned above, the change is valid only once and the next order will be reset to the previous order.
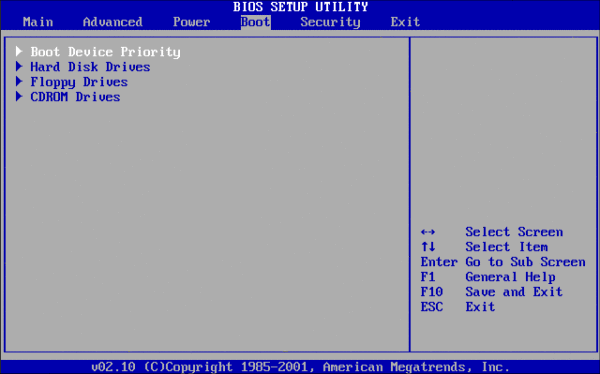
Using the BIOS/UEFI
NOTE: This procedure requires changes from BIOS/UEFI. If you do not follow the instructions indicated in this guide, you could prevent the correct startup of the system or the correct functioning of part or all of its components. Teknologya assumes no responsibility in this regard: once again, we recommend that you
strictly adhere to the instructions below, without changing anything else, and do not proceed if you do not know what you are doing.
Here changing the boot order of the PC becomes a little more complex since it will be up to us to find the useful entry. First, we restart the PC and enter the BIOS or UEFI.
Now let’s look carefully at the interface that stands before us. In case we have BIOS, it will probably be a blue screen with white writing. If we have UEFI, it will be something less difficult with windows, clickable menu items and mouse support.
We are looking for some reference to Boot, Boot Order Or similar terms. Once found, move on that item using the directional arrows left and right (BIOS) or by clicking on the appropriate button (UEFI).
At this point all connected boot devices should appear; alternatively, it may be necessary to select the item “Boot device priority” or “Change boot order” or similar. In short, something that alludes to changing the boot order of the PC.
In UEFI everything will be simple: just change the boot order with the mouse using a practical drop-down menu. If we have legacy BIOS or UEFI, instead, we will have to juggle the directional arrows and the suggested keys to move the peripherals up or down.
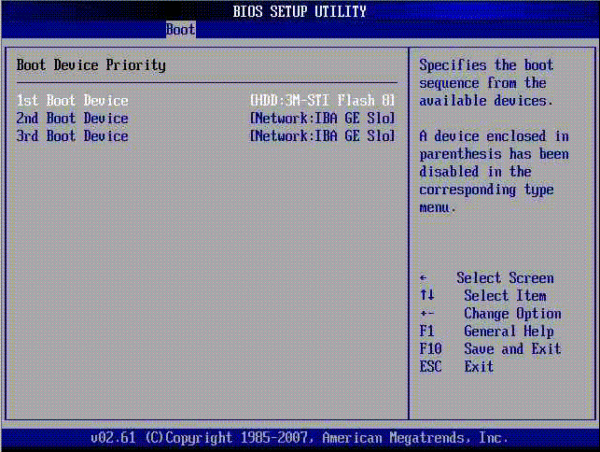
Let’s take the image above as an example. To change the boot order, select the first choice (1st boot device), enter and choose from the available options (hard disk, DVD, USB, network or other). Eventually we do the same with the second and third choices. After that, as suggested by the small side menu, we press F10 to save and exit the BIOS.
In other BIOSes, however, it may be necessary to juggle the keys PagSu and PagGiu, or
+ and –, to change the boot order of the PC. We always take a look at the little help at the bottom or on the side: the keys to use will be indicated there.
Once the change has been made, press the key (in the example of the first F10) to exit and save, or press ESC to return to the main BIOS screen and move to Exit, selecting Save & Exit from there.
- Done, we managed to change the boot order of the PC: from this moment the computer will always try to boot from the first device chosen, progressively passing to the following options. Recall, if the choice is not definitive, to restore the order to normal (i.e. re-set the disk as the first boot device) after completing our task.