Recover files from a broken PC: what a headache! Whether we want to admit it or not, the so-called “lost data nightmare” prevents anyone who has to deal with a computer from sleeping soundly: what if tomorrow morning the computer suddenly refuses to work and your hard disk is damaged?
Or if, worse still, the laptop PC should slip out of your hands and end up ruinously on the ground causing damage … irreparable?
Your disc, at that point, would enter the inevitable and generic category of broken things. If at least once in your life you have asked for assistance for your now gone gem talking to the system administrator – consultant – whoever else is “broken computer”, you will certainly have realized that this nice and often extravagant character will have replied “In what sense is broken? What’s wrong with it? What if you try to turn it on?”
If after this question you go
t annoyed and you lowered the phone on your face … well, you hurt. As a representative of the category I tell you that communicating to a professional that your computer is “broken” is equivalent to saying … almost nothing!
Whether it is desktop or portable, such a machine is made up of several physical components and a slight failure of one of these is enough to lead to rather serious consequences: a fan that works badly could cause you to suddenly turn off the computer (“it is broken because it turns off alone” ), a badly installed bank of RAM may not even let you turn it on (“it’s broken, it doesn’t turn on right”), a power failure could have caused a disk and system file failure (“it’s broken because I don’t get the Windows screen”) until I get to the worst case, the one where you took the laptop out of your hand and you literally destroyed the monitor ( “it’s broken because the screen broke”).
However, whether you are in one case or another, the prospect of having lost all your photos, videos, songs, or personal documents after breaking your computer makes you shiver. Yet it is not said that a broken computer corresponds to lost data.
If the disk (or disks) installed inside has not “broken”, there is always something to do. And if you really don’t want to send your “little one” for assistance … you can always try one of the “do it yourself” methods described below to recover files from a broken PC!
Warning: what is written below is not intended to represent the “definitive solution” to the problem of data recovery. The main purpose of this article is to show that even if your computer breaks for one of the most disparate reasons, in most cases there is the possibility of recovering the data present in it.
Recover files from a broken PC with Windows and Mac
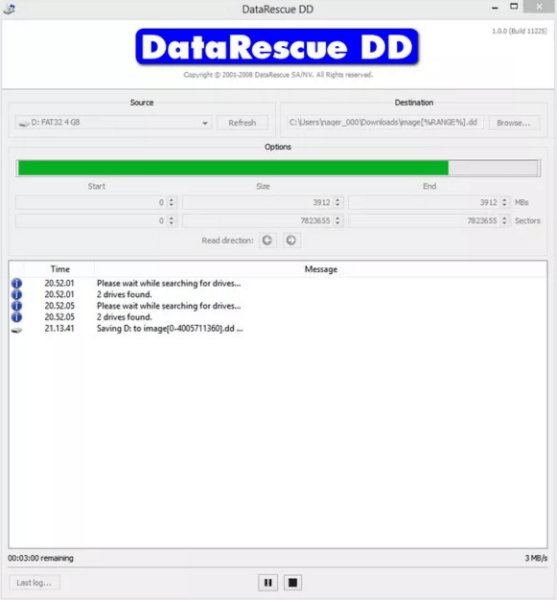
If we are looking for a tool that can save and recover data from a broken PC, then perhaps you should give DataRescue DD a chance. It is a program with a graphical interface whose task is the recovery of data and the backup of partially damaged storage devices.
DrDD creates complete or partial images of damaged disks or memory cards and saves them on another disk device or another memory device, allowing data recovery while minimizing the risk of further damaging damaged media.
DrDD is available for computers with Windows and OS X/macOS and can be downloaded at the following link:
DOWNLOAD | DataRescue DD
Recover files from a broken PC with Linux
You need to have a second computer available to create the bootable device.
Linux live file recovery can be applied to both desktop computers (pre-assembled or not) and lpatops, as long as:
- the computer in question can turn on;
- the computer in question is able to boot from USB or CD ROM;
- if we have a working laptop but with a damaged display, we can use a second monitor and connect it to the notebook in question.
The first step is to create a device containing a live Linux distribution, in this case my advice is to download Ubuntu because of the total compatibility with almost all hardware.
Once this is done, all we have to do is burn the downloaded image onto a DVD or create a USB stick that can be started using tools such as Unetbootin.
The secret to succeed in this (apparently) titanic endeavor is to find out how to boot your computer from DVD or USB stick . And for this … w
e have the right guide for you!
Note: if we have chosen a DVD as the installation medium for the live version of Linux, unless we have two separate DVD players we will not be able to save the files on the medium.
Now let’s arm ourselves with some empty DVD, an external hard disk or a second USB stick to be used as a support for saving data, insert the bootable DVD or the stick created previously, restart the computer and wait for Ubuntu to load.
Once the system has started, click on the “File” icon on the side panel (the second from the top).

Here, at this point you can view the list of all the disks present in the system and from there you can take the data you need by copying them on the chosen medium! If you need to burn files on a DVD medium you can use Brasero, the burning program offered by Ubuntu.
Note: I suggested Ubuntu because of the compatibility, nobody forbids you to follow a completely similar procedure with another Li
nux distribution.
Unmount the hard drive and install it on a second PC
Premise: if you have never disassembled a disc, use this approach only and exclusively if assisted by someone capable of doing it. Damage to the computer (or data) in the event of errors may be irreparable.
This is also a good solution to recover your data: in this case too we can proceed with both desktop PCs and notebooks (keeping in mind that for all notebooks and some pre-assembled desktops this procedure could void the warranty), and I recommend you to proceed in this way only if:
- the computer in question refuses to turn on;
- you have a second computer in which to install the disassembled disk;
- if the hard disk belongs to a damaged laptop: arm yourself with a 2.5 ″ hard disk box with USB output (to use the damaged notebook hard disk as an external hard disk) or a 5V – 12V adapter cable ( to install the hard drive of the damaged notebook as an internal hard drive);
- if the hard disk belongs to a damaged desktop PC: check that the second computer has a free slot to install it; if the computer you will use to copy the data is a notebook, also in this case you will need a box for hard disk that has USB output (2.0 or 3.0 makes little difference, for this purpose).
At this point there is nothing more to say: unmount your disk from the “broken” computer, install it on the second computer, turn on the latter and … copy your data!
What if I still can’t see the data on the disk?
If you have tried both the first and the second solution and your disk has not shown signs of life … it is extremely likely that the disk is damaged. At this point it is likely that your data has been lost, however there are
always service centers capable of performing data recovery operations: if it is vital information and documents you can contact them! But I must stress that recovering data from damaged disks, in economic terms, costs quite a lot.
In reality there are also procedures that can be performed with tools accessible to all to try to recover data from damaged disks. But be
careful to use “grandmother’s methods” in cases like this: the probability of worsening the situat
ion and making recovery very complicated even for professionals can become extremely high.