The procedure for changing the PS4 hard drive is not very simple and varies by console model, but it is important to know how to expand the internal space for more games. By following this tutorial carefully, you will be able to swap the hard drive smoothly and best of all without losing your precious games and saves.
![How to change the PS4 hard drive [internal hard drive]](https://teknologya.com/wp-content/uploads/2019/11/How-to-change-the-PS4-hard-drive-internal-hard-drive.jpg)
How to change the PS4 HD
The process of replacing the PS4 hard drive [internal hard drive] is quite simple as long as the user observes some details before getting started.
You will need:
- A philips key;
- An empty external hard drive to back up data to;
- A flash drive of at least 2 GB of internal space;
- The latest PS4 complete system software file, available at playstation.com.
Do not download the update file (PS4 System Software Update File) available on the same page or the procedure will not work; - A 2.5 ” HD, SSHD or SSD and up to 4 TB of space, completely blank, to be installed on the PS4.
1. Back up the PS4
Before you start, connect the external hard drive to your PC and format it in FAT32 or extFAT (prefer FAT32), as NTFS drives are not recognized by PS4. It must also be at least twice as large as what is installed on the console.
On PS4, sync your trophies with PSN before you start:
- Select “Trophies”;
- Hit the “Options” button on DualShock 4;
- Select “Sync with PlayStation Network.”
After these steps are completed, do the following:
- Connect the external hard drive to the PS4;
- Select “Settings”, “System”, “Backup and Restore”;
- Select “Back up PS4”;
- Check all the boxes and select “Next”;
- The backup will start, wait for it to finish.
Depending on the amount of data, the process can take several hours; - After the process, disconnect the external hard drive;
- Turn off the PS4 and disconnect the console from the mains.
2. Change the hard drive
Now you have to open the PS4 drawer and change the hard drive. However, the position of the drawer and how to access it varies by console model (whether Fat, Slim or Pro):
On PS4 Fat
- Support the PS4 Fat on a flat surface and turn the side with the smaller top cover towards you;
- Gently press down on the cover until it clicks, and slide it toward you until it is removed;
- Loosen the screw that secures the hard drive drawer.
Depending on the PS4 model, it may be in front or left of the drawer; - Pull the drawer out, remove the screws holding the hard drive and remove it;
- Position the new HDD, SSHD or SSD, screw it into the drawer, put it back on the PS4 Fat and secure it again with the screw;
- Replace the cover by sliding it against the console until you hear a click.
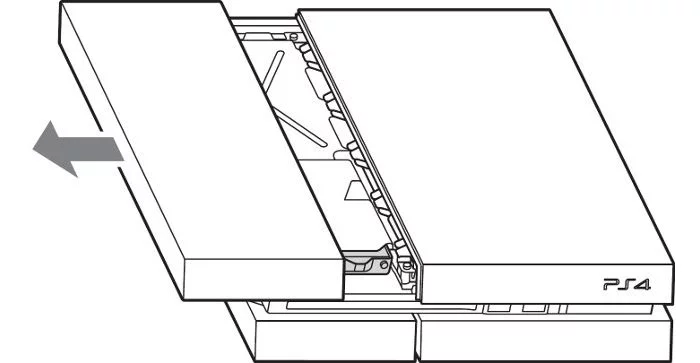
On PS4 Slim

- Turn the PS4 Slim with the back facing you;
- Slide the cover in the right corner out until it comes off;
- Remove the set screw and pull the drawer out (it is positioned on the right side);
- Pull the drawer out, remove the screws holding the hard drive and remove it;
- Position the new HDD, SSHD or SSD, screw it into the drawer, put it back on the PS4 Slim and secure it again with the screw;
- Replace the cover by sliding it against the console until you hear a click.
On PS4 Pro
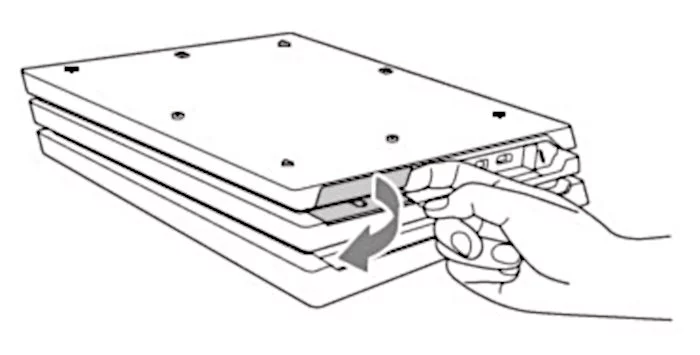
- Turn the PS4 Pro upside down and with the back facing you;
- Gently press the right end of the lid to the left until it releases and remove it;
- Remove the set screw and pull the drawer out;
- Remove the screws that secure the hard drive and remove it;
- Position the new HD, SSHD or SSD, screw it into the drawer, put it back on the PS4 Pro and secure it again with the screw;
- Put the cap back on, first left and then right, and gently press until you hear a click.
3. Install the system
The hard drive has been installed. But as it is empty, you need to install the PS4 operating system:
- Connect the USB stick to the PC;
- Create inside it the folder “PS4” and inside it the subfolder “UPDATE”, both with all letters in uppercase;
- Copy the file with the console OS to the “UPDATE” folder.
The file must be named “PS4UPDATE.PUP”; - Reconnect the PS4 to the TV and the mains;
- Connect the flash drive to one of the console’s USB ports;
- Connect the DualShock 4 controller to the USB cable and this to another PS4 USB port;
- Press and hold the console’s “Power” button for 7 seconds until it beeps a second time;
- Press the “PS4” the DualShock 4 and you will be in Safe Mode;
- Select option 7, “Boot PS4 (reinstall system software)”;
- Wait for the process to complete;
- In the end, the PS4 system will open, usually enter your user account.
4. Restore the backup
With everything installed, all that remains is to recover the backup that is on the external hard drive:
- Connect the external hard drive to the PS4;
- Select “Settings”, “System”, “Backup and Restore”;
- Select “Restore PS4”;
- The PS4 will display the backup file on the external hard drive, select it.
Depending on the amount of data, the process can take several hours.
And that’s it, you just changed the hard drive of your PS4 and lost no games or save.