If Windows installed on your PC does not start and you want to recover your files before formatting the hard drive and do a fresh installation of Windows, see how to recover your files when Windows does not start.
To recover the files, you will need to use a Live CD, which is basically an operating system that can be run from a CD/DVD or USB stick and allows you to recover the files on the hard drive.
In this specific case we will use the Ubuntu Live CD, which is a very simple to use Linux distro that allows you to copy the hard drive files to the USB stick similar to Windows.
How to recover files when Windows does not start:
What you need:
- 1 flash drive of at least 2GB to put the Ubuntu Live CD.
- 1 USB stick or external hard drive capable of placing your files.
- A second computer to prepare the flash drive for recovery.
Preparation:
1. Download the Ubuntu Live CD and the Live Linux USB Creator program.
2. Connect the USB stick to the second PC that will be used to burn Ubuntu.
3. Install the Live Linux USB Creator program on your computer and run it.
a) In step 1, select the drive corresponding to your flash drive.
b) Click on “ISO/IMG/ZIP” and select the ubuntu-16.04.2-desktop-i386.iso file you downloaded.
If the message “ This Linux is not on the compatibility list ” appears, proceed normally.
c) In step 3, do not modify anything. aladağ escort
d) In step 4, check the option to format the flash drive and uncheck the last option.
e) In step 5, click on the lightning icon to start the installation.
f) Then the USB stick will be formatted and the Ubuntu Live CD will be installed on the USB stick.
Recovering files from computer hard drive:
1. After burning the Ubuntu Live CD to the USB stick, put the USB stick on the computer where Windows is not starting, turn on the computer and boot it by booting from the USB drive to load Ubuntu.
To boot the computer from the USB stick, you need to change the boot order in the computer’s BIOS setup. Some computer models also offer a “boot menu“.
To access the BIOS setup, you need to press a key during boot. This key is usually displayed during the boot screen and varies from manufacturer to manufacturer and can be Del, Esc, F1, F2, F8, F10, F12.
The option to change the boot order is usually on the “Boot” tab. You must use the + and – or F5 and F6 keys to set the boot order. When done, press F10 to save changes.

2. During Ubuntu startup, select the “English US” option from the side menu and select the “Try Ubuntu” option. If you are prompted for a password, type ubuntu user and leave the password blank.
3. When loading Ubuntu, you will see several icons in the sidebar. Click on the “cabinet” icon to open a file explorer equivalent to Windows Explorer in Ubuntu for you to access your hard drive.
4. In Ubuntu File Manager, you will see several hard disk icons in the sidebar. Click on the icons to access the hard disk partitions and find out which one Windows is installed on.
5. When accessing the hard drive, you will see the windows files. If you do not see the same folders, you have not opened the right hard disk. Check the other sidebar icons.
Note: If clicking a hard disk displays the error message “Could not access Volume. Error mouting\dev\sda2“, Skip to the end of the tutorial to find out how to troubleshoot this issue.
6. Once you have identified the right hard drive, plug the second flash drive into the computer and a window will open with the contents of the USB. If the window does not open, you can access the USB stick from the sidebar.
7. Find the folders where the files you want to copy to the USB stick are. The user’s personal files are saved in the “Users> Username” or “Document and Settings> Username” folders.
8. Now copy the files just as you do in Windows. Select the files and press the “CTRL + C” key, open the flash drive in the sidebar and press “CTRL + V” to paste the files into the flash drive.
9. Then just repeat the same process to copy other files from the hard drive to the USB stick.
10. When you are finished saving files, click the last icon displayed at the top right of the window and select the “Shut Down” option to shut down the computer.
How to resolve the error when accessing the hard disk in Ubuntu:
If when trying to access the hard disk in Ubuntu, the message “ Could not access Volume. Error mouting \dev\sda2…“, as shown in the image below, see how you can solve this error:
This error happens when the PC is hibernated or when Windows 8/10 Quick Start is active. To be able to access and copy the hard drive files in Ubuntu, let’s use the command below:
- In Ubuntu, press Ctrl + Alt + T to open Terminal
- Type udisksctl mount -b /dev/sda2 -o ro and press ENTER
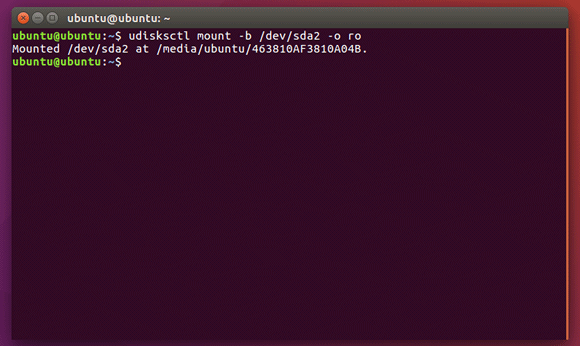
Note that “sda2” is the name of the hard disk partition displayed in the error message. Check the “sda” displayed in the error message and replace sda2 in the above command with the sda displayed in your error message.