When it comes to putting games on Raspberry Pi, Recalbox is the most appropriate software. Although newer than RetroPie, this emulation-oriented distribution of video game consoles is extremely easy to set up, a
nd supports a lot of legacy systems. Learn how to put games in Raspberry Pi (Recalbox).
![How to install games in Raspberry Pi [Recalbox]](https://teknologya.com/wp-content/uploads/2019/03/How-to-install-games-in-Raspberry-Pi-Recalbox.png)
How to put games in Raspberry Pi (Recalbox)
You will need:
- A Raspberry Pi (any model);
- One microSD memory card;
- The image of the Recalbox system;
- The Etcher, the program will install Recalbox on the memory card;
- A pendrive, to store the ROMs.
1. Install the Recalbox on the memory card
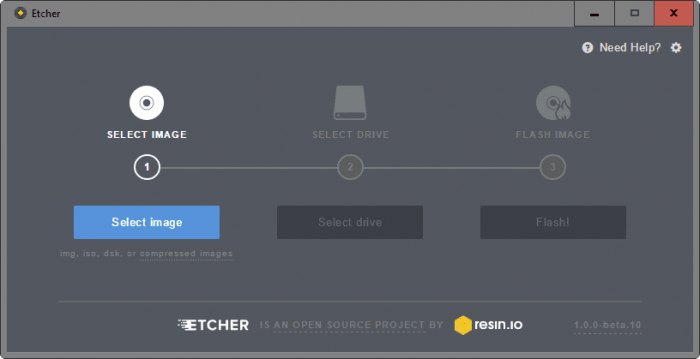
- Download the Recalbox image from the official website;
- Download and install Etcher ( Windows, MacOS and Linux) on your computer;
- With the memory card in your computer, open the Etcher;
- Click Select Image, and select the Recalbox image;
- Click Select Drive, and select the drive of the memory card;
- Click Flash.
Etcher will format the card and install Recalbox. At the end, you can remove the card (securely) and install it on Raspberry Pi.
2. Configuring Recalbox
- Connect the Raspberry Pi with a connected video ga
soft cialis online in the best USA pharmacy https://iamkira.net/wp-content/uploads/2025/12/wiki/wiki-soft-cialis.html no prescription with fast delivery drugstore
me controller, preferably via cable.
Recalbox will detect the control and ask you to configure it; - Recalbox’s default control layout is Super NES. Press and hold the “A” button (“B” on the Xbox controller, or “circle” on the PS3/PS4);
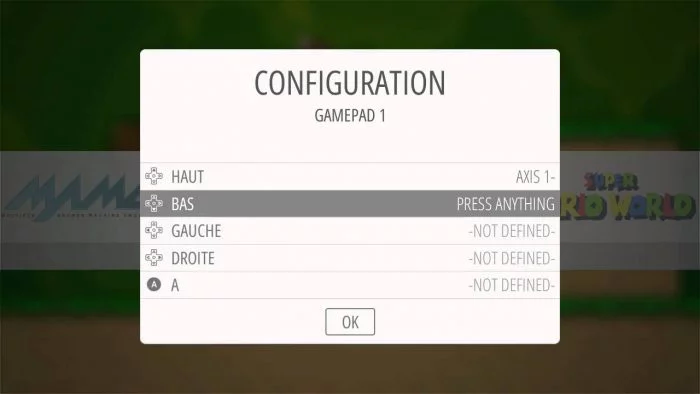
- Set the control by pressing the keys and directional ke
cialis soft online in the best USA pharmacy https://www.homecareassistanceamarillo.com/wp-content/uploads/2025/12/wiki/wiki-cialis-soft.html no prescription with fast delivery drugstore
ys in the order they appear;
- Once setup is complete, press “A” button to OK.
3. Placing games on Raspberry Pi
Recalbox allows you to store game ROMs directly on a flash dri
ve, which saves a lot of space on the memory card.
To do this, do the following:
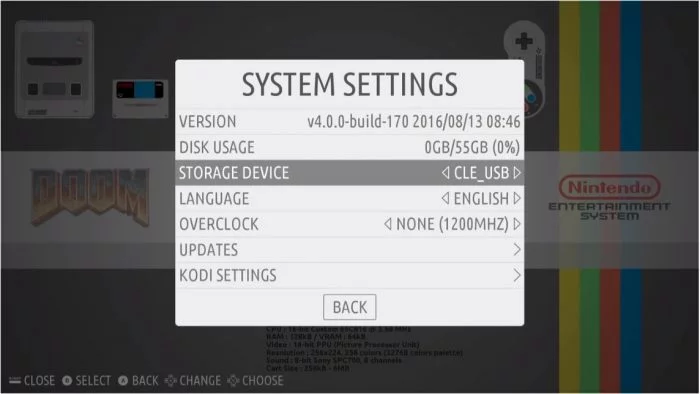
- Plug an empty flash drive (no files or folders) into the Raspberry Pi off;
- Turn on the Raspberry Pi, press the “Start” button on the control;
- In the menu, press the “A” button in System Settings;
- On the next screen, scroll down to Storage Device and move the directional sideways until the name of your pendrive appears;
- Scroll to Back and press the “A” button.
Recalbox will display a message that needs to be restarted. Press “A”. - After that, wait until the system restarts completely, and then turn off Raspberry Pi (press “Start”, select “Exit”, “Off”, and “OK”);
- Remove the pendrive and connect it to your computer;
- Open the Roms folder of the pendrive.
Inside it, there will be several folders, one for each console; - Copy ROM files from the games to the folders corresponding to the system to which they belong;
- Once the process is complete, remove the pendrive safely, reconnect it to the Raspberry Pi, and turn it on.
And ready.
Recalbox will recognize all the ROMs you have copied to the pendrive, and just start playi
ng. Do searches on Google to find the ROMs of your favorite games.
It is worth mentioning that some games may work better on the newer versions of Raspberry Pi Model 3 (especially the two third generation ), but simpler games, up to 16-bit consoles, or older Arcade machines, run well on Raspberry Pi Zero.
The only thing though, is that if you prefer to use the smaller version of the small computer, you will need adapters or USB hubs to connect more than one peripheral at the same time.