Since you need to open a Virtual Machine Disk file on your computer, and now you are looking for a special program to do it without too many problems? In this new tutorial today we will talk about how to open VMDK.
VMDK: what it is
For those not familiar, the VMDK format is used by the well-known VMware virtualization software to store virtual machine files. We can compare it to a hard disk that contains all the emulation files inside.
How to open VMDK with VMware
The first solution that we recommend using to open a VMDK file is the VMware software. The program is available on Windows in a free version that can only be used for personal and non-commercial purposes called VMware Workstation Player, while on MacOS only the paid version called VMware Fusion can be downloaded, which, however, can be tried for free for 30 days.
If you have a Windows PC, as mentioned earlier, you can use the VMware Workstation Player program. However, if you have 32-bit Windows, you need to download an older version of the program, namely VMware Player 6.0.
Read More: How to Crack Microsoft Practice Test
Let’s find out how to use it:
- To download VMware Workstation Player, go to the download page and click on the Download button located at VMware Workstation xxx Player for Windows 64-bit Operating Systems. To download VMware Player 6.0, instead, connect to this link and click on the Download button.
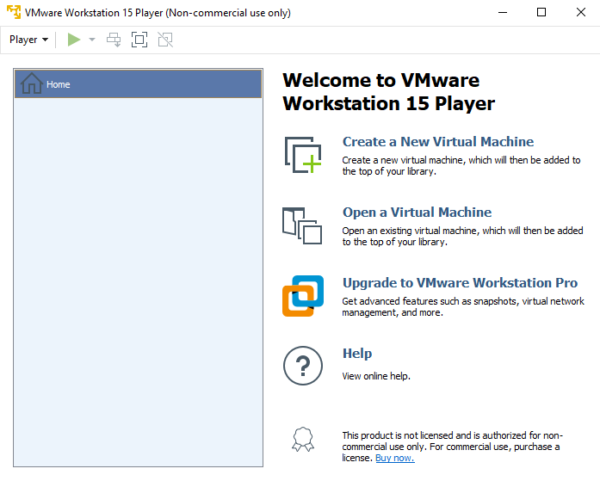
- Once the installation is complete, make sure that the Use VMware Workstation 15 Player for free for non-commercial use option is active and first press Continue and then Finish.
- At this point, if you have both the VMDK file and the VMX file, click on Player in the top left corner and choose first File and then Open. In the window that appears, select the VMX file of the virtual machine to proceed with the import. The Virtual Machine will be shown on the main screen of VMware Workstation Player and can be started by performing a simple double click.
- If, instead, you only have the VMDK file available, then you need to create a new virtual machine and replace the hard disk of the Virtual Machine in your possession. To do this, click on Player in the top left corner, press on File and choose New Virtual Machine. Alternatively, use the key combination Ctrl + N.
- Once this is done, select the I will install the operating system later option and click on Next.
- Now, select the operating system present in the virtual machine to be imported through the Microsoft Windows, Linux or Other entries, select the version via the drop-down menu just below and click on Next to continue.
- After assigning the preferred name to the virtual spot, press Next twice consecutively and then Finish to complete the operation.
- Continue by right-clicking on the Virtual Machine in the main VMware Workstation Player window and select Settings from the appeared menu.
- At this point, select the Hard disk icon and press Remove to delete the Virtual Machine disk.
- After that, click on the Add button, select the Hard disk icon in the window that opens and then press Next.
- Now, check the SCSI option, press Next again and then check the box next to the item Use an existing virtual disk.
- After clicking on Next, press the Browse button and select the VMDK file of the virtual machine you wish to import into the program. If the image is composed of several files, you will have to select the one without numbers at the end of the name.
- Complete the operation by clicking on Finish and selecting the Keep Existing Format option if you are asked to convert the disk image. You can start the virtual machine by double clicking on its name.
If you have a Mac, instead, you need to use the VMware Fusion program which, as anticipated in the last few lines, is paid but can be used for free for 30 days.
Let’s find out how to use it:
- Open Safari or the default browser you use to browse the Internet, connect to the download page and press the Download now button depending on whether you want to try Fusion 11 or Fusion 11 Pro. The difference is that the Pro version provides tools designed for IT professionals, developers and companies that need a sandbox of testing and development. In addition to this, Fusion Pro allows you to manage up-to-date configuration and simulation of virtual networks, clone VMs and have remote controls for vSphere improved.
- Once the installation is complete, make sure you select the option I want to try VMware Fusion for 30 days and press Continue.
- After that, choose Test VMware Fusion, click Continue, enter the password for your user account and enter. You can also choose whether or not to send the program usage statistics to developers.
- If a warning about osascript appears that requires you to check System Events.app, click OK twice in a row and click Open System Preferences. Through the window that appears, click on the padlock on the bottom left, enter the password for your user account and enter. After that, check the VMware Fusion icon to allow the software to work properly.
- At this point, through the main screen of the program, click on Create a custom virtual machine to create a new Virtual Machine and click on Continue.
- After that, select the operating system and the desired version to install in the virtual machine and click Continue.
- Then select the Legacy BIOS entry, click Continue and choose to create a new virtual disk.
- After pressing Finish, choose the name and folder in which to save the virtual machine and press Save to confirm.
- Now, select the virtual machine you just created, pressed on the menu Virtual Machine, choose Hard disk (IDE) and tap on Hard disk (IDE) Settings.
- In the next step, click on the small arrow next to Advanced Options and press the Remove Hard Disk and Move to Trash button to delete the virtual disk.
- Now, click on the Add Device button at the top right, choose existing hard drive and select the VMDK to import.
- Complete the operation by clicking Apply and starting the virtual machine.
If you also have the VMX file available, you can import it by clicking on the appropriate button in the main VMware Fusion window.
How to open VMDK with VirtualBox
If you have decided to use VirtualBox, you can import a virtual spot in a very simple way, valid for all supported operating systems such as Windows, macOS and Linux.
Let’s see together how to do it:
- Connect to the download page of VirtualBox, and then press the link Windows hosts, OS X hosts or Linux distros (found under VirtualBox xxx platform packages ) depending on whether you have Windows, MacOS or Linux.
- Once the installation is complete, open the program and click on the New button at the top left to create a new virtual machine.
- In the window that appears, enter the name of the Virtual Machine, select the operating system present in the VMDK file at your disposal and press Continue.
- At this point, set the RAM to be dedicated to the VM, press Continue and check the Use an existing virtual hard disk file option.
- In the next step, click on the folder icon to the right of the drop-down menu, select the VMDK file to import and click on Create.
- Now all you have to do is double-click on the name of the virtual machine in the main VirtualBox window to start it.
We also advise you to install the drivers that allow the Virtual Machine to work properly with the actual operating system called Guest Additions. All you have to do is press on the Devices menu at the top, choose Install Guest Additions and follow the guided procedure.
How to open VMDK: alternatives
In addition to the two programs listed above, it is possible to use two other equally valid software to open files in the VMDK format. Find them below.
- WinMount (Windows)
- Parallels Desktop (macOS)