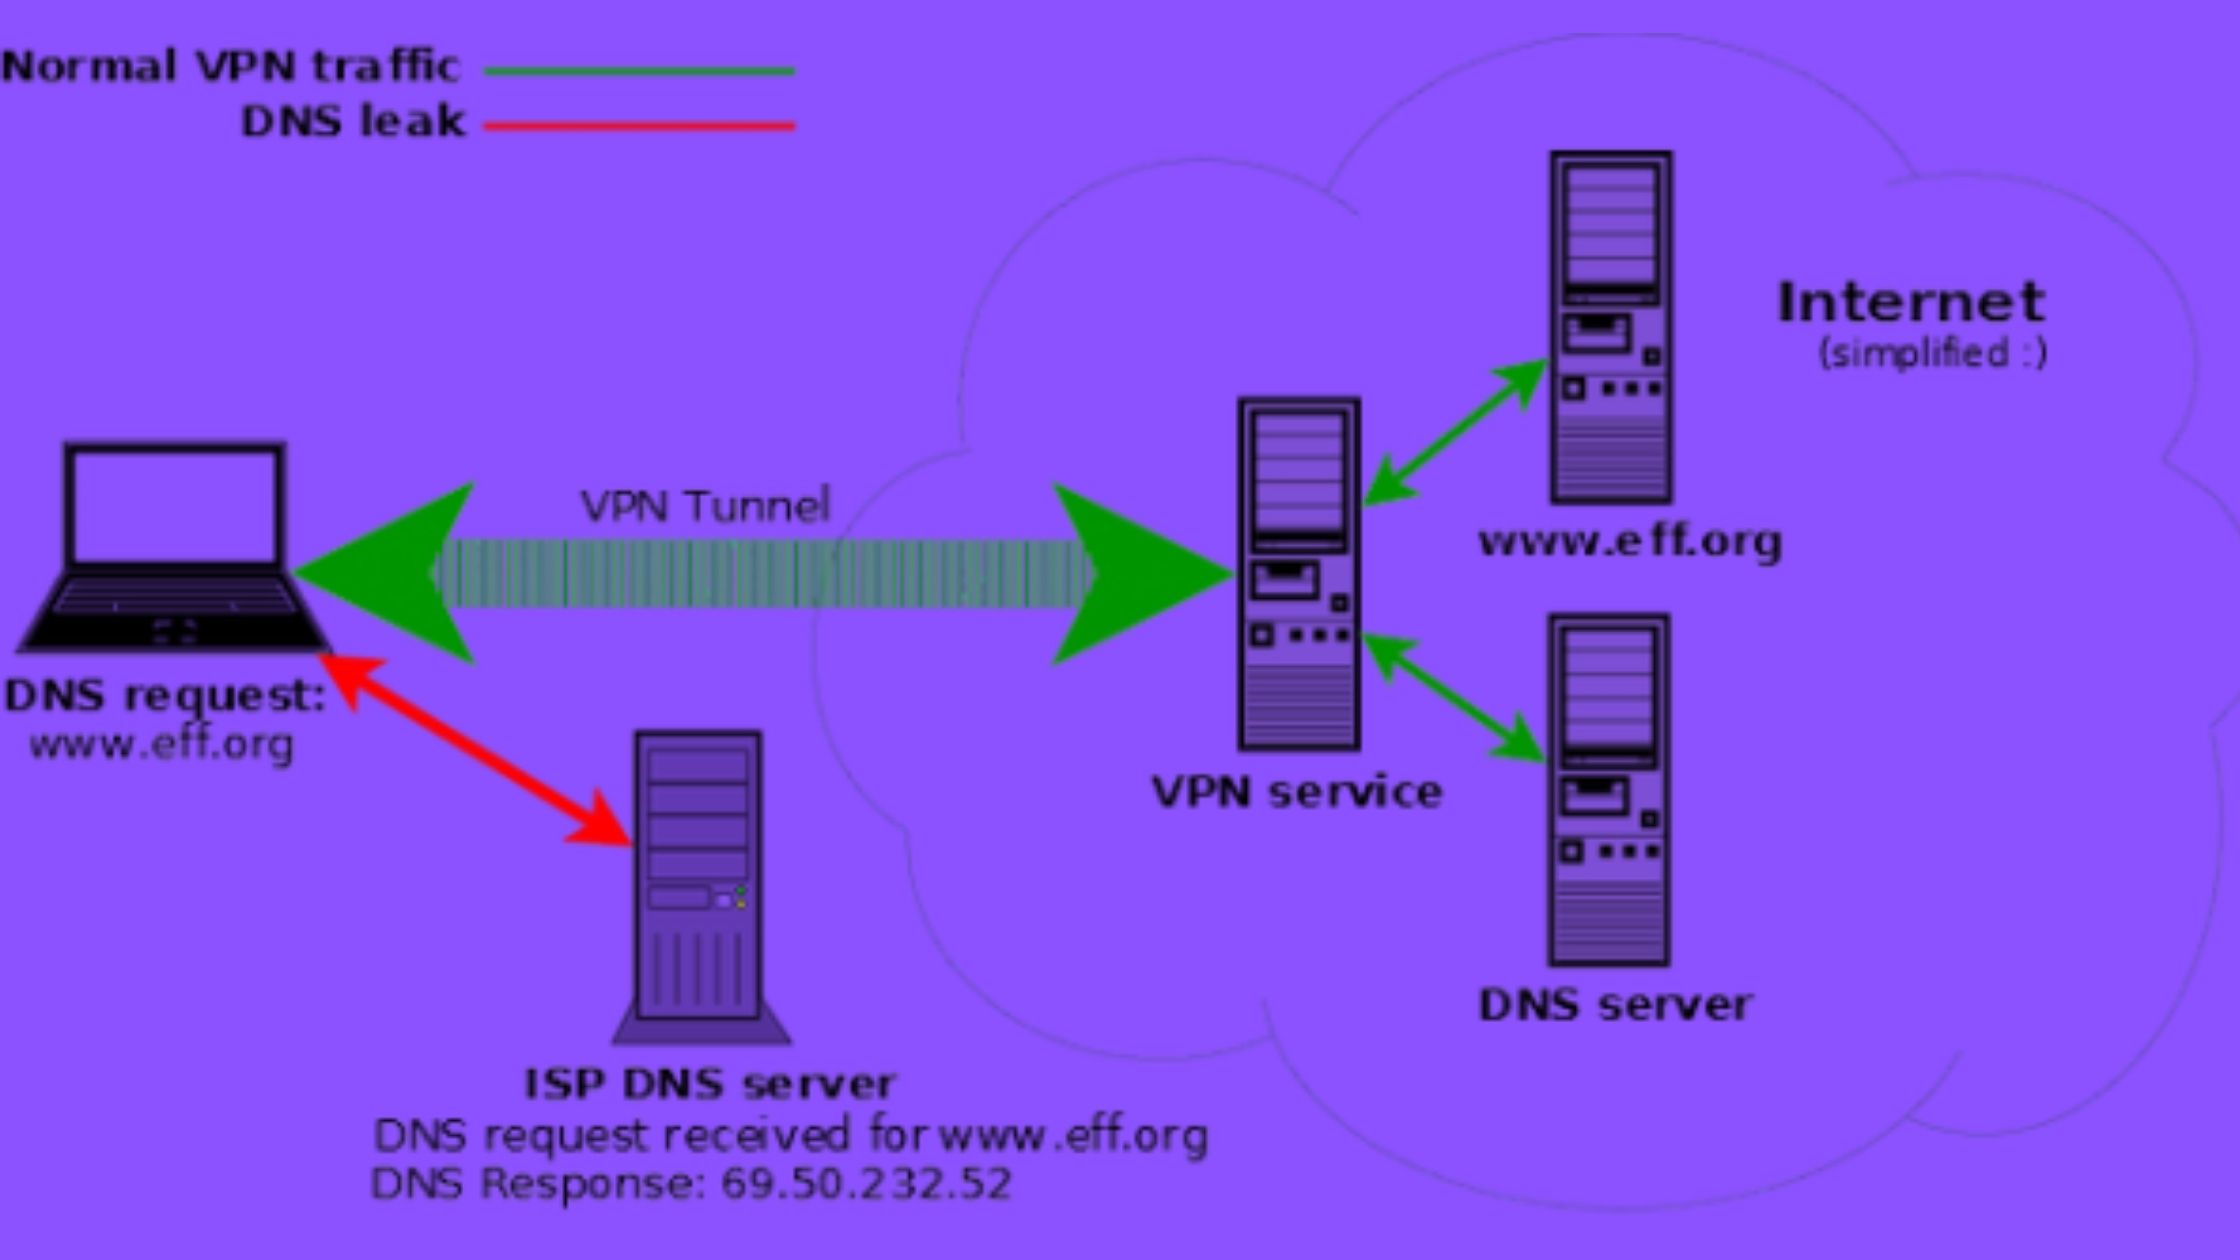
Have you ever heard of DNS servers? No? This is somewhat strange, you use them practically every day! DNS, in fact, are the tools that allow you to reach the websites you visit by typing simple text addresses (e.g. google.com ) instead of long numerical sequences (e.g. 74.125.224.72), which would then be the real coordinates of the sites. As a result, knowing how to manage DNS servers and set up fast DNS servers can make opening Web pages faster.
Yeah … but how do you find fast DNS servers for your connection and set them on your devices? Good question! The answer, although it may seem complex, is actually extremely trivial: using DNS programs, for example the ones that I will show you in this tutorial, which are all free and easy to use.
Are you interested? Yup? Very well. So I suggest not to waste any more time and immediately take action. Position yourself comfortably in front of your trusted PC and immediately begin to focus on reading all of the following. I sincerely hope that, in the end, you will feel happy and satisfied with what you have learned.
Index
The best programs for DNS
Let’s start immediately from the highlight of the tutorial and find out, together, what DNS programs you can use on your computer: find what I believe to be the best in the category right below, for Windows, macOS and Linux. Try them now and you won’t regret it!
Namebench (Windows/macOS/Linux)
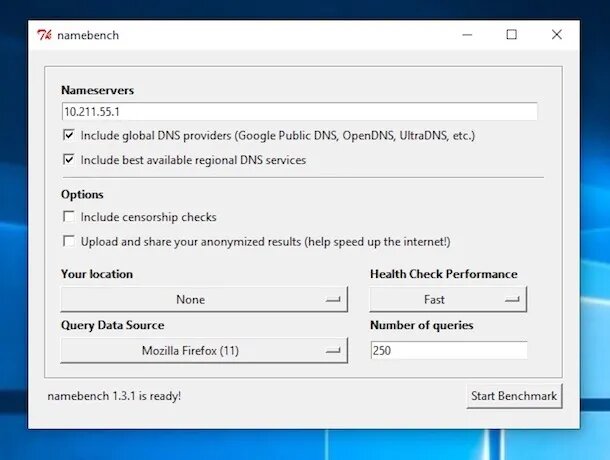
The first of the DNS programs I want to tell you about is Namebench: it is a free software compatible with Windows and macOS that allows you to find the fastest DNS servers for the connection in use. Characterized by an extremely essential user interface, it is able to test all the most popular DNS servers, such as those of Google and OpenDNS, comparing them with each other and with the DNS servers of the telephone operator that provides the Internet connection.
To use it on your computer, connect to the program’s website and click on the namebench-xxx-Windows.exe link (if you are using Windows ) or on the namebench-xxx-Mac_OS_X.dmg link (if you are using macOS ) which are in the part at the top of the displayed page.
When the download is complete, if you are using Windows, open the obtained .exe file and click on the Extract button in the window that appears on the desktop. If, on the other hand, you are using macOS, open the resulting .dmg package, drag the program icon to the Applications folder of your computer, right click on it and select the Open item twice in a row, so as to start Namebench however, going around the limitations that Apple imposes on applications from non-certified developers (an operation that must be performed only at the first start).
Now that, regardless of the operating system used, display the software window on the screen, click on the Start/Start Benchmark button located at the bottom right, in order to start the search for the best DNS servers. When finished, a web page will open with the recommended DNS configuration for the computer in the upper right corner. The test will go on very long, so try to be patient.
Keep in mind that, by default, the program includes global DNS (e.g. Google’s) and the best ones for your area in the search. If you want to disable one of the two options, before starting the DNS search, remove the check from the relevant items in the upper part of the window.
From the Options section, on the other hand, you can make further customizations to the program’s settings, while the menus at the bottom allow you to select the reference location, the number of queries, etc. by hand.
DNS Jumper (Windows)
DNS Jumper is one of the best DNS programs available on Windows, through which you can find out the DNS addresses that are faster for the connection used. It is very easy to use, at no cost, requires no installation and allows you to change the identified DNS without having to go through the system settings.
To download the software to your computer, visit the DNS Jumper website and click on the Download button at the bottom of the page. When the download is complete, extract the ZIP archive obtained in any position on the PC, double click on the .exe file
inside it and press the Yes button in response to the warning that appears on the desktop.
Now that you see the main window of DNS Jumper, select the network card of your PC from the Select network card drop-down menu (top), click on the faster DNS button (left), then click on Start DNS test in the further window that opens and waits for a speed test of the various servers.
At the end of the operation, you can decide whether to speed up your web browsing by adopting the new DNS (those shown below), clicking on the Apply DNS server button, whether to stay with the default ones or whether to change them manually (taking note of what reported by the program) by simply closing the displayed window.
If you are interested in it, I would like to point out that you can also choose the DNS to be applied manually, via the drop-down menu Choose a DNS server located in the center (to apply them, click on the Apply DNS button ), and that you can access the program settings to customize the server list and operation, by clicking on the Options button (bottom left).
Change DNS Helper (Windows)
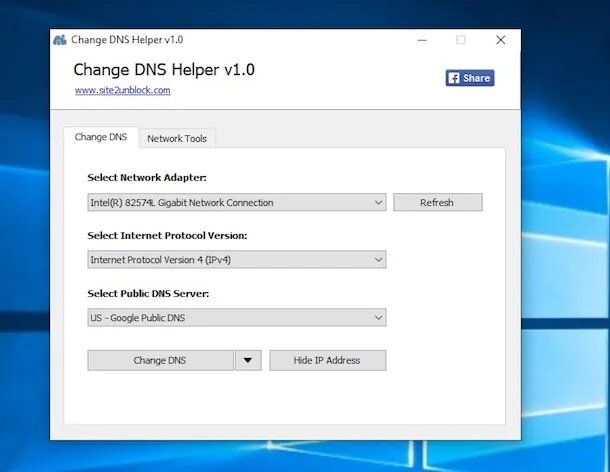
Change DNS Helper is a very simple to use program that allows you to quickly change the DNS servers of your Internet connection avoiding errors and unnecessary waste of time in advanced network settings.&
nbsp;It’s free, it works only on Windows operatin
g systems and is also available in a portable version, which does not require installation to work.
To download it to your computer, connect to the program’s website and press the Portable Version button attached to the displayed web page. When the download is complete, extract the ZIP archive obtained in any position on the computer and start the .exe file inside it corresponding to the version of Windows you are using: ChangeDNSHelper32.exe for 32 bit Windows or ChangeDNSHelper64.exe for Windows a 64 bit, then click on the Yes button in the window that opens.
Once the software window appears on the desktop, select the network card from the Select Network Adapter menu, choose the Internet reference protocol ( IPv4 or IPv6 ) from the center menu and select the DNS you want to use from the Select Public DNS drop-down menu Server. Then presses the Chang DNS button located at the bottom.
If, before changing the DNS, you want to make a backup of the current ones, you can do it
by selecting the appropriate option from the menu that appears by clicking on the button with the arrow at the bottom. From the same menu you can also choose to reset the DNS and restore them.
If you are interested in it, I would like to point out that by selecting the program’s Network Tools tab, you can access and use a whole series of useful tools to manage and test the functioning of the Internet connection on your PC.
Public DNS Server Tool (Windows)
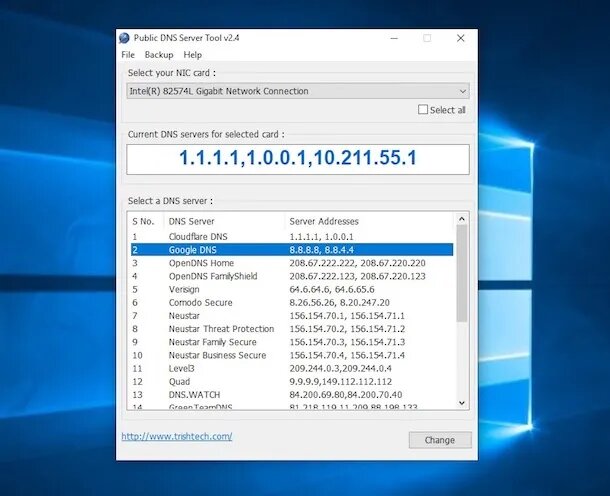
Similar to what has been seen with other programs in this review, the Public DNS Server Tool is a small free tool for Windows, through which you can change the DNS servers used on your PC without going into the Internet connection settings.
To download it to your PC, connected to the program’s website, scroll down the displayed page and click on the Download Public DNS Server Tool link. When the download is complete, extract the ZIP archive obtained in any position on the computer and start the .exe file contained inside it, then click on the Yes button in the window that appears on the screen.
Now that you see the main screen of the program, select your computer’s network card from the first drop-down menu, choose the DNS server to use from the list in the center and apply the settings by pressing the Change button at the bottom right. That’s all!
Manual configuration of DNS
Didn’t the DNS programs I told you about earlier satisfy you? Then know that you can also set up DNS servers manually. All you have to do is follow the directions below. Let’s start with computer operating systems.
- Windows – open the Control Panel by looking for it in the Start menu, click, in the window that opens, on the item Network and Internet and/or on the words Network and sharing center (depending on the type of display set), sel
ect the name of the connection is in use and click the Properties button. In the further window that opens, double-click on the item Internet Protocol version 4 (TCP / IPv4), tick the option Use the following DNS server addresses and set the values of the DNS servers. Then apply the changes by clicking on the OK button. - macOS – access System Preferences by clicking on the icon (the one with the gear) attached to the Dock bar, click on the Network item in the window that opens and, subsequently, on the Advanced button. Select, therefore, the DNS tab, press the [+] button located at the bottom left and type the DNS you want to use in the appropriate fields, then press the OK button.
DNS can also be set on smartphones and tablets (only with regard to Wi-Fi connections, unless you resort to specific apps, such as those you fin
d in the final step of this guide). Below you will find out how to proceed on Android and iOS.
- Android – press the Settings icon (the one with the gear) in the drawer (the screen where there are icons of all the apps), select the Wi-Fi item and keep pressed for a few seconds on the name of the connection currently in use. Then tap on the Edit icon from the menu that appears, check the Show advanced options option, select the word Static from the IP Settings menu and set the DNS servers you want to use in the DNS 1 and DNS 2 fields. Then presses the Save button.
- iOS – tap on the Settings icon (the one with the gear ) on the home screen, select the Wi-Fi item, press on the “i” next to the name of the connection in use and complete the DNS field with the servers you want use.
For further information on what is indicated in this passage and on the nature of DNS servers in general, refer to my guide on how to configure DNS.
App for DNS
And what about the mobile side? Are there any apps with which you can determine, set up and manage the fastest DNS servers for your connection? The answer is yes. If you are interested in it, you will find below what I believe to be the most interesting solutions in the category, both for Android and for iOS.
- 1.1.1.1: Faster Internet ( Android/iOS ) – is the free app of ColoudFlare that allows you to take advantage of the company’s DNS servers promising a high level of privacy. Note that it installs a VPN profile on the device, which, thanks to encryption, allows you to shield the DNS requests sent from your smartphone or tablet and allows you to take advantage of CloudFlare’s DNS servers even under the 4G/3G network.
- DNS Changer ( Android ) – free app for Android that allows you to change the servers of the Internet connection, both of the Wi-Fi network and of the connection to the cellular network, also allowing you to quickly choose from a list of DNS selected and ready to use.
- DNS Override ( iOS ) – app for iPhone and iPad thanks to which you can choose, set up and test different DNS servers for Wi-Fi connection in a practical and fast way. It’s free, but offers in-app purchases (starting at € 2.29) to unlock extra features.